Here is what I call my Window Pane Joining Method. This joining method features short rows or Entralc crochet methods to join square motifs using horizontal stitches. I call this the Window Pane joining method because the result looks like an old fashion window. This method was inspired by the borders found on traditional quilts. I love how a fancy crocheted (or quilted) square looks when framed by a simple border. It is like framing a masterpiece.

This method works best when the squares/motifs being joined are the same size and have the same or nearly the same amount of stitches on each side. If there is a slight difference in stitch counts you can accommodate this by slip stitching or sc2tog. I will explain this more in step 3.
How to Join Squares using the Window Pane Joining Method
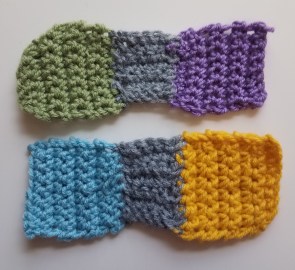
Arrange your squares (motifs) in the pattern you want. In this example (and in my Patchwork Mystery Crochet Along Blanket) you will join the short sides of the squares together. You start joining squares horizontally then will join the longer rows together.
Joining 2 square together:

1. Join your yarn to the corner stitch of Square A (yellow). Chain 5. Slip stitch in the Corner stitch of Square B (blue).


2. Next slip stitch in the next stitch in Square B. This will be located above or to the left the the corner stitch. This slip stitch act as the turning and joining chain for the next row. Single crochet across in the next 5 stitches. Sc2tog (single crochet 2 together) the last stitch of the row with the next stitch of Square A (yellow). There should be 6 sc for this row.


3. Repeat Row 2, working back and forth joining the 2 squares. Continue until you have reached the end of the squares. The last row should line up with the edge of the squares.
If the number of stitches for the 2 square are not the same you can fix this by slip stitching up 2 stitches when turning. If you need to do this more than once, try to spread it out evenly when joining the squares.


Repeat Steps 1 -3 for joining the remaining squares together in rows.
Joining the Rows of Squares:
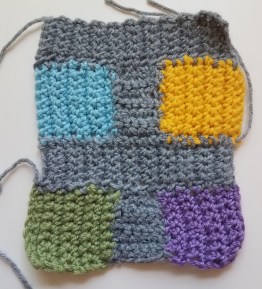
Repeat Steps 1-3 for joining the rows of squares together. Start with Square A (yellow) and join to Square C (purple). Keep joining the squares, treating the border sections (gray) the same as the squares. You will keep going until you reach the end of the rows.
Your squares will now look like they are joined by + signs of the border color.


Bordering the Squares:
For this example I used a border of 6 single crochet stitches. For the Patchwork Mystery Crochet Along Blanket, I used a border of 10 single crochet stitches.
4. Join your yarn to the corner stitch of Square A (yellow). Chain 7.

5. Skip 1st chain (this is the turning chain). Single Crochet across in the next 5 stitches. Sc2tog in the last stitch and the next stitch of Square A.
6. Slip stitch in the next stitch of Square A. Single crochet across in the next 6 stitches. Chain 1 (turning chain).
Repeat steps 5 & 6 across until you reach the end of the piece.


Repeat steps 4 – 6 on all 4 sides of the square.

I like the look of adding the border 1st side, next to the opposite sides of the piece then border the other sides.

This joining method is flexible and can easily be adjusted to your project and liking. As always if you have any questions please let me know.

Pingback: Patchwork Mystery Crochet Along: Reveal & Joining Method | Crochet Anything