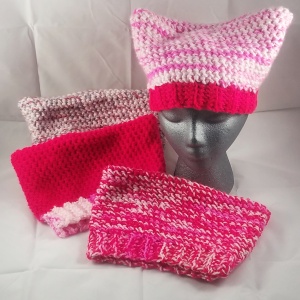
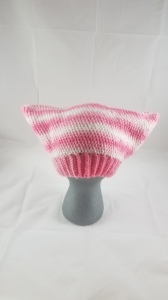
Pussy Cat Hat Pattern
Updated on 1/31/17 to include DK/Sport (3) weight yarn
This pattern was created to make hats for friends attending the Women’s March on Washington as part of the Pussy Hat Project. I picked up this yarn on clearance and had trouble finding a pattern I liked that worked for the yarn, so I made up my own. The pattern is written in US terminology and designed for using 3 different weights of yarn, so it is the perfect for any yarn in your stash.
Patterns are for an adult size hat (19″ in circumference and 7.5″ in length) The hats can easily be made smaller or larger by adjusting the number of rows or rounds.
Abbreviations:
SC – single crochet
CH – chain stitch
BLO – back loops early (make crochet stitch in the back loop of the stitch from the row below)
Pussy Cat Hat – Worsted Weight Yarn 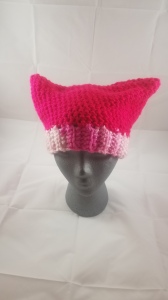
You will need:
Size H hook (5.00 mm)
Approximately 150 yards of worsted weight yarn. I used Premier Yarns Deborah Norville Everyday Soft Worsted in Neon Pink and Deborah Norville Serenity Baby in Tea Roses.
Chain 11
Row 1: Turn and sc in 2nd chain and sc across (10 sc) turn
Row 2: Sc in BLO across. Turn (10 sc)
Row 3 to 50: Repeat row 2
Without twisting join end of strip together and join using single crochet.
Round 1: Working on the side of the rib strip, work 70 sc stiches around. Don’t join or turn
Round 2: Sc in each sc in round. (70 sc)
Round 3 to 22: Repeat round 2
Fold the top of the hat in half and sew across. You can use either slip stitches, single crochet or mattress stitch.
Weave in ends.
Pussy Cat Hat – Bulky/Chunky Weight Yarn
You will need:
Size K hook (6.5 mm)
Approximately 130 yards of bulky weight yarn. I used Premier Yarns Deborah Norville Serenity Chunky in Pink Candy.
Yarn needle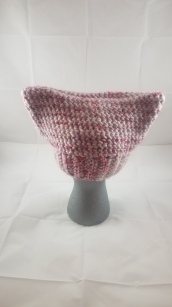
Chain 9
Row 1: Turn and sc in 2nd chain and sc across. Turn (8 sc)
Row 2: Sc in BLO across. Turn (8 sc)
Row 3 to 40: Repeat row 2
Without twisting join end of strip together and join using single crochet.
Round 1: Working on the side of the rib strip, work 60 sc stiches around. Don’t join or turn
Round 2: Sc in each sc in round. (60 sc)
Round 3 to 14: Repeat round 2
Fold the top of the hat in half and sew across. You can use either slip stitches, single crochet or mattress stitch.
Weave in ends.
Pussy Cat Hat – Super Bulky Yarn or 2 strands of worsted held together
You will need:
Size L hook (8.00 mm)
Approximately 240 yard of worsted weight yarn split into 2 balls or different colors.
Yarn needle
Chain 7
Row 1: Turn and sc in 2nd chain and sc across. Turn (6 sc)
Row 2: Sc in BLO across. Turn (6 sc)
Row 3 to 36: Repeat row 2
Without twisting join end of strip together and join using single crochet. 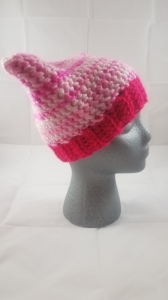
Round 1: Working on the side of the rib strip, work 55 sc stiches around. Don’t join or turn
Round 2: Sc in each sc in round. (55 sc)
Round 3 to 14: Repeat round 2
Fold the top of the hat in half and sew across. You can use either slip stitches, single crochet or mattress stitch.
Weave in ends.
Pussy Cat Hat – DK or Sport Weight Yarn
You will need:
Size G hook (4.25 mm)
Approximately 180 yards of DK or Sport weight yarn. I used Lion Brand’s Ice Cream yarn in Strawberry
Yarn needle
Chain 11
Row 1: Turn and sc in 2nd chain and sc across. Turn (10 sc)
Row 2: Sc in BLO across. Turn (10 sc)
Row 3 to 88: Repeat row 2
Without twisting join end of strip together and join using single crochet.
Round 1: Working on the side of the rib strip, work 105 sc stiches around. Don’t join or turn
Round 2: Sc in each sc in round. (105 sc)
Round 3 to 26: Repeat round 2
Fold the top of the hat in half and sew across. You can use either slip stitches, single crochet or mattress stitch.
Weave in ends.
Please contact me with any questions or issues you have with this pattern.
You are free to sell items made with this pattern just note that the original pattern is mine and the pattern itself is not to be resold.
Happy Hooking!!!

THANKS FOR THIS! Best crochet version I have found. I will make one to wear long after today’s marches.
LikeLike
This is wonderful! I didn’t have time to make anything ahead of the march, but I’m going to make these for all my friends who participated — a perfect (purrrr-fect) memento!
LikeLike
Very nice pattern I’m just confused why we don’t join or turn? Do you just stitch the side up as you do the top then?
LikeLike
You turn on the rows when making the brim and when switching to the rounds for the top it is worked in a continuous circle. I realize the pattern is a bit confusing and will fix it. Pattern writing is still new to me so please let me know if you have any more questions.
-Jessica
LikeLike
I know, when writing, we tend to take things for granted. Like you may automatically think people assume, but, ch 1 at end of all rows is pretty standard. But, it’s cool.. you’ll get it. You might also edit to add chain 1 to the end of the rounds. This keeps the hat from getting tighter; or in other words, losing it’s circumference. Thanks for always answering our questions.
LikeLike
Thanks for the instructions, I made my pussy cat hat today!!!! Yeah!
LikeLike
Congrats! Please share pictures! If you use Ravelry you can link your pictures up to the pattern.
LikeLike
How do you make the ears pointy??
LikeLike
Hi Sharon, The ears naturally form when you wear the hat. Because the top of the hat is square and your head is round the points will stick up and look like ears when you wear it.
-Jessica
LikeLike
Just a thought. Did you forget to add “chain 1” to rid of each row of the ribbing section? I know it may seem obvious to most old time crocheters like me.but still… I like the pattern!
Pat D in NJ
LikeLike
Hi Pat, I did but I am used to seeing the chain one being included in the Turn at the end of the row. I am new to pattern writing and I will keep that in mind for future patterns.
-Jessica
LikeLike
Do you chain one when you turn on the brim? Mine is looking all wierd and crazy.
LikeLike
Hi Shelly,
Yes, for the brim you chain one at the end of a row to turn.
-Jessica
LikeLike
I tend to crochet tightly, so I generally have to move up a hook size or two. How many stitches & rows should there be per inch for each version?
LikeLike
Hi Erin, I don’t have the gauge for this pattern worked up yet, but I will stitch up some samples and update the pattern this weekend. I tend to crochet loosely so you might need to go up a hook size. Also you could increase the number of rows and rounds needed to fit your head.
-Jessica
LikeLike
Thank you for the patterns! I’m confused about a couple of things, though…for the ribbed strip, it says to join with a sc, but now I’m left with what looks like a tear or split up the back. Was I supposed to sc across the entire strip to join the whole lengths of the ends, or just sew it together later? But if they’re joined it ends up being a lot smaller (I used worsted weight) and can’t even fit it over my 11 year old’s head as is, let alone an adults. (Was dumb of me not to measure, but still feel like the pattern is made for smaller heads)
Also, are your hats made having the wrong side facing out? Is that just a preference, or am I missing something?
And, when you say “fold the top in half” does that mean fold the top INSIDE itself a little bit and then sew the top together, or just line up the top together and then sew? In the pics it looks like they could be folded in, but maybe it’s sewn and then the entire hat is turned inside out?
Thank you!
LikeLike
Hi Jessica, I hope this helps.
For the ribbed strip you should join with a sc across. This makes a big loop. At this point you can check that the hat is big enough. If not you can try adding more rows or using a bigger hook if you tend to crochet tight. If you do add rows to the ribbing remember to add more stitched to the rounds.
You can decided which side you want facing out before you sew up the top. I find it depends on the yarn if I like the way the wrong or right side looks better. To sew the op together you don’t need to fold anything on the inside. You can just stitch/sew the two sides together. I find it easiest to lay the hat flat on a table, and stitching straight across. It is again a personal preference if you want to sew or single crochet across the top. If you sc across the top you might want to turn the hat inside out. But it is up to you. There is no wrong or right way to finish the hat. You don’t need to do anything extra to make the ears stick out. They will naturally form when you put the square top on you head. However, some people have stitched diagonal lines to help the ears stick out more. I hope this helps. I am very new to pattern writing and I appreciate your feedback on how I can improve.
Thank you, Jessica
LikeLike
Thank you for your help! I know, it was totally my fault for not measuring!
LikeLike
So.. when the ribbing strip is being made, does it have to be 50 rows, (as is written for th worsted weight version) or do you make it as long as will fit your head? Thanks..
LikeLike
Hi Patricia, Make it long enough to fit around your head. The ribbing has a lot of stretch to it. When doing the stitches in the round I like to keep it around 3 stitches for every 2 rows of ribbing. Because the ribbed stitches stretch so much you need to add stitches when you work in the round or the hat will be too tight. So for every 4 rows of ribbing you add to the pattern you will add 6 stitches to the row in the round (4+2). Please let me know if you have any more questions.
-Jessica
LikeLike
The 4+2 is helpful, thank you!
LikeLike
Thank you. Have you ever added pom-poms to the ears?
LikeLike
No, I have not. But you definitely could add pom-poms to the ears of the hat and it would look cute.
LikeLiked by 1 person
Thanks so much for this posting! Some of the other pussy cat hat patterns were weird or not clear or for bulky yarn. I really appreciate you sharing this! ~Hope
LikeLike